Downloading photos from a camera
When you use a digital camera, your photos are stored on a removable memory card — most likely a CompactFlash (CF) or Secure Digital (SD) card.
Rather than having to tether your camera directly to a computer, you can remove the memory card and insert it into a card reader device, then download your photos from the card reader to your compute via a USB cable or Firewire cable, depending on
which connection your camera supports (Firewire is the faster of the two).
When you start downloading images from a camera, your system’s default application or dialog for acquiring images may launch automatically.
Instead of using the system dialog, we recommend using the Photo Downloader application that is included with Bridge. Instructions are provided here.
To download photos via a card reader andPhoto Downloader:
1. Take the card out of your camera and insert it into the appropriate slot in the card reader.
2. Plug the card reader into your computer. If the default system application for acquiring photos launches, exit/quit it.
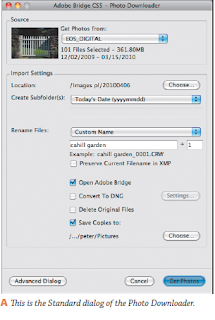
3. Launch Bridge, then click the Get Photos from Camera button at the top of the Bridge window. Th e Photo Downloader dialog opens.A If an alert dialog appears and you want to make Photo Downloader the default capture application, click Yes (as we do); if not, click No.
4. From the Get Photos From menu in the Source area, select your card reader.
5. In the Import Settings area, do the following: To change the save location, click Browse/ Choose, then navigate to the desired folder.Click OK/Choose again to assign that folder and return to the Photo Downloader dialog.
To create a new subfolder within the folder you just selected, choose a naming convention from the Create Subfolder(s) menu, or choose Custom Name and enter a folder name (or choose None for no new subfolder).
Optional: To assign your digital images recognizable names and shorter sequential numbers in lieu of the long default number, choose a Custom Name option from the Rename Files menu, then enter a name and a starting number. A sample of your entries displays in the Example fi eld.
Check Open Adobe Bridge to have the photos display in Bridge when the download is
completed.
Keep the Preserve Current Filename in XMP, Convert to DNG, and Delete Original Files options unchecked.
We recommend that you check Save Copies To then click Browse/Choose to send copies of your photos to a designated folder on an external hard drive, as a backup.
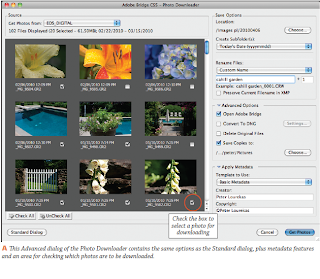
6. If you want to download select photos (instead of the whole batch) from your memory card, click Advanced Dialog to display the larger Advanced dialog.A Below the thumbnail window, click UnCheck All, then check the box below each photo to be downloaded. Or click,then Shift-click a sequence of photos, then check the box for one of them; a check mark will appear below each selected photo.
Optional: In the Apply Metadata area, enter Creator and Copyright info to be added to the metadata of all downloaded photos. Th is data will display in Bridge.
➤ To switch back to the smaller Standard
dialog at any time, click Standard Dialog.
7. Click Get Photos to start the downloading process. When the downloading is fi nished, the Photo Downloader dialog is dismissed automatically. If you checked the Open Adobe Bridge option, your photos will display in a new window in Bridge. Don’t worry about previewing or opening them just yet. We’ll step you through that process later.
8. Now that you’re done using the Photo Downloader, you should insert a blank DVD
and burn the copies of your photo fi les to the DVD as a permanent backup copy. In the Mac OS, you can do this via drag-and-drop in the Finder. If you need to learn how to copy fi les to a DVD, consult the Help fi les for your operating system.
Th e Bridge application ships with Photoshop and is aptly named because it serves as a bridge to programs in the Adobe Creative Suite.
In Chapter 1, you learned how to use Bridge to synchronize the color settings for your Creative Suite programs. With its large thumbnail previews of fi les from Adobe Creative Suite applications, Bridge is the best vehicle for opening fi les, and it off ers a host of other useful features.
Th is chapter begins with instructions for downloading photos from a digital camera. Following that, you will use Bridge to preview, examine, label, rate, sort,
and fi lter your fi le thumbnails; customize the Bridge workspace; organize thumbnails into collections and collapsible stacks; search for, move, copy, and assign keywords to fi les; and open fi les into Photoshop. You will also use Mini Bridge, a panel that lets you access the Bridge features in Photoshop. Th ere’s a lot to learn in this comprehensive chapter — progress through it
at your own pace.
Launching Adobe Bridge
To launch Adobe Bridge:
To open the Adobe Bridge window, do one of the following:
In Windows or in the Mac OS, on the Application bar in Photoshop, click the Launch Bridge button (Ctrl-Alt-O/Cmd-Option-O).A In Windows, click the Start button, choose All Programs, then click Adobe Bridge CS5.
In the Mac OS, double-click the Adobe Bridge CS5 application icon or click the Bridge icon on the Dock.
➤ Th ere is a Bridge feature that lets it launch automatically at startup and stay in the background in stealth mode. We suggest that beginning users turn this feature off by going to the Edit/Adobe Bridge CS5 > Preferences dialog for Bridge (Ctrl-K/Cmd-K), Advanced panel, and unchecking Start Bridge at Login.
Ending a work session
To close a document:
1. Do one of the following:
Click the on a document tab.A Choose File > Close (Ctrl-W/Cmd-W).
Click the Close button in the upper right corner of a fl oating document window in Windows, Bor the upper left corner of a fl oating document window in the Mac OS.C
2. If you try to close a fi le that was modifi ed since it was last saved, an alert dialog will appear.D Click No (N)/Don’t Save (D) to close the fi le without saving it, or click Yes (Y)/Save (S) to save the fi le before closing it (or click Cancel to cancel the close command).
➤ An asterisk on a document title bar or tab indicates that the document contains unsaved changes.
➤ To quickly close multiple open documents, press Ctrl-Alt-W/Cmd-Option-W. In the alert dialog that appears, you can check Apply to All,★ if desired, to have your response apply to all the open documents, then click Don’t Save or Save.
➤ In Photoshop, to close a fi le and launch or go to Bridge, choose File > Close and Go To Bridge (Ctrl-Shift-W/Cmd-Shift-W).
To exit/quit Photoshop:
1. In Windows, choose File > Exit (Ctrl-Q) or click the Close button for the application frame. In the Mac OS, choose Photoshop > Quit Photoshop (Cmd-Q).
2. All open Photoshop fi les will close. If any changes were made to any open fi le since it was last saved, an alert dialog will appear. Click No (N)/Don’t Save (D) to close the fi le without saving it, or click Yes (Y)/Save (S) to save it before exiting/quitting Photoshop (or click Cancel to cancel the exit/quit command).
Using the Status bar
Using the Status bar and menu at the bottom of the document window, you can read data about the current fi le or fi nd out how Photoshop is currently using
memory.
To use the Status bar:
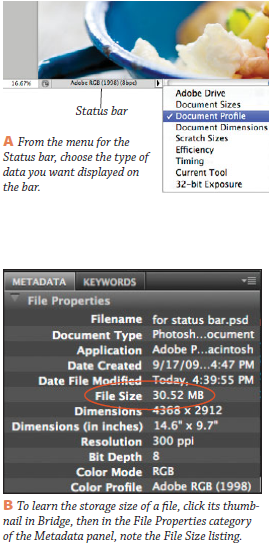
From the menu next to the Status bar at the bottom of a fl oating or tabbed document window,choose the type of data you want displayed on the bar:
Document Sizes to list the approximate fi le storage size of a fl attened version of the fi le if it were saved in the PSD format (the value on the left)and the storage size of the current fi le including layers (the value on the right).
Document Profi le to list the embedded color profi le (the words “Untagged [RGB or CMYK]”appear if a profi le hasn’t been assigned).A Document Dimensions to list the image dimensions (its width, height, and resolution).
Scratch Sizes to list the amount of RAM Photoshop is using to process all currently open fi les (the value on the left) and the amount of RAM that is currently available to Photoshop (the value on the right). If the fi rst value is greater
than the second, it means Photoshop is currently utilizing virtual memory on the scratch disk.
Effi ciency to list the percentage of program operations that are currently being done in RAM as opposed to the scratch disk (see page 391).
When this value is below 100, it means the scratch disk is being used.
Current Tool to list the name of the current tool.To view detailed data about a particular fi le, use the Metadata panel in Bridge.
To fi nd out the storage size (and other data)of a fi le:
1. On the Application bar in Photoshop, click the Bridge button. In Bridge, click an image thumbnail (see page 36).
2. In the Metadata panel on the right, under File Properties, note the File Size value.B
Saving your file
If you’re not sure which format to use when saving a fi le for the fi rst time, you can safely go with the native Photoshop format, PSD. One good reason to do so is that PSD fi les are more compact than TIFFfi les (see also the sidebar on the following page).
To save an unsaved document:
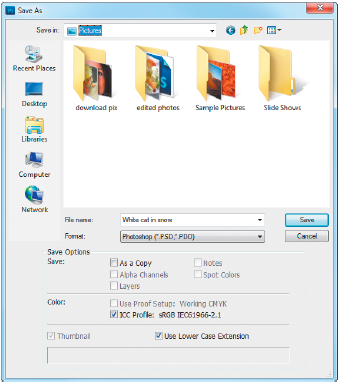
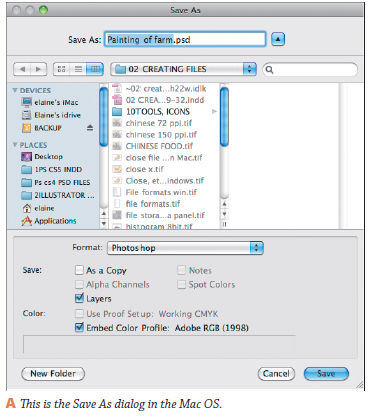
1. If the document window contains any imagery,you can choose File > Save (CtrlS/Cmd-S); if it’s completely blank, choose File > Save As (Ctrl- Shift-S/Cmd-Shift-S). Th e Save As dialog opens.
2. Type a name in the File Name fi eld A/Save As fi eld (A, next page).
3. Choose a location for the fi le.In Windows, if you need to navigate to a diff erent folder or drive, use the Save In menu at the top of the dialog.
In the Mac OS, click a drive or folder in the Sidebar panel on the left side of the window.
To locate a recently used folder, use the menu below the Save As fi eld.
4. Choose a fi le format from the Format menu.Only the native Photoshop (PSD), Large Document Format (PSB), TIFF, and Photoshop PDF formats support layers (see the information about fl attening layers on pages 134 and146).
5. If you’re not yet familiar with the features listed in the Save area, leave the settings as is.Th e As a Copy option is discussed on page 26.
6. If the fi le contains an embedded color profi le and the format you’re saving to supports such profi les, in the Color area, you can check ICC Profi le/Embed Color Profi le: [profi le name] to save the profi le with the fi le. (To learn about embedded profi les, see pages 10,
13, and 16.)
7. Click Save.
➤ In the Mac OS, to have Photoshop append a three-character extension (e.g., .tif, .psd) to the fi le name automatically when a fi le is saved for the fi rst time, in Edit/Photoshop > Preferences >File Handling, choose Append File Extension:
Always. Extensions are required when exportingMacintosh fi les to the Windows platform and when posting fi les to a Web server.
➤ To learn about the Maximize PSD and PSB File Compatibility option in the File Handling panel of the Preferences dialog,

Once a fi le has been saved for the fi rst time, each subsequent use of the Save command overwrites (saves over) the last version.
To save a previously saved fi le: Choose File > Save (Ctrl-S/Cmd-S).Th e simple Revert command restores your document to the last-saved version.
Note: We know you can’t learn everything at once,but keep in mind for the future that the History panel, which Chapter 10 is devoted exclusively to,serves as a full-service multiple undo feature. Also,a use of the Revert command shows up as a state on the History panel, so you can undo a revert by clicking an earlier history state.
To revert to the last saved version of a fi le: Choose File > Revert.
➤ To undo the most recent modifi cation, choose Edit > Undo (Ctrl-Z/Cmd-Z). Not all edits can be undone by this command. For the other undo
and redo commands
Th e Save As command lets you save a copy of your fi le under a new name (say, to create a design, document color mode, or adjustment variation) or with diff erent options. Another important use of this command is to save a fl attened copy of a fi le in a different format, for export to another application. Th is is necessary because most non-Adobe applications can’t import Photoshop PSD fi les or read Photoshop layers.
To save a new version of a fi le:
1. Choose File > Save As (Ctrl-Shift-S/Cmd- Shift-S). Th e Save As dialog opens.
2. Change the name in the File Name/Save As fi eld. Th is is important!
3. Choose a location for the new version fromnthe Save In menu in Windows or by using the Sidebar panel and columns in the Mac OS. (Read about the new Save As to Original Folder preference on page 390.★)
4. Optional: From the Format menu, choose a different fi le format. Only formats that are available for the fi le’s current color mode and bit depth are listed. Note: If you try to save a 16-bit fi le in the JPEG (.jpg) format, Photoshop will produce a fl attened, 8-bit copy of the fi le automatically.★ Beware! If the format you’ve chosen doesn’t support layers, the Layers option becomes dimmed, a yellow alert icon displays, and layers in the newversion are fl attened.
A DESIGNER’S BEST FRIEND To create document variations within the same fi le, explore the Layer Comps panel; see pages 382–384.
5. Check any available options in the Save area, as desired. For example, you could check As a Copy to have the copy of the fi le remain closed and the original fi le stay open onscreen, or uncheck this option to have the original fi le close and the
copy stay open.Depending on the current File Saving settings in Edit/Photoshop > Preferences > File Handling(and depending on whether you’re working on a Windows or Mac OS machine), some preview andextension options may be available in the Save As dialog. See pages 389–390.
6. In the Color area, check ICC Profi le/Embed Color Profi le: [profi le name], if available , to include the profi le, for color management.
7. Click Save. Depending on the chosen fi le format,another dialog may appear. For the TIFF format,see page 417; for EPS, see pages 418–419; orfor PDF, see page 420. For other formats, see Photoshop Help.
➤ If you don’t change the fi le name or format in the Save As dialog but do click Save, an alert will appear. Click Yes/Replace to replace the original fi le, or click No/Cancel to return to the Save As dialog.
➤ To optimize a fi le in the GIF or JPEG format for Web output,
Creating document presets
If you tend to use the same document size, color mode, or other settings repeatedly in the New dialog, take the time to create a document preset for those settings. Th ereafter, you’ll be able to access your settings via the Preset menu, which will save you startup time as you create new fi les.
To create a document preset:
1. Choose File > New or press Ctrl-N/Cmd-N. Th e New dialog opens.
2. Choose settings, such as the width, height, resolution, color mode, bit depth, background contents,color profi le, and pixel aspect ratio. Ignore any setting that you don’t want to include in the preset; you’ll exclude it from the preset in step 5.
3. Click Save Preset. Th e New Document Preset dialog opens.A
4. Enter a Preset Name.
5. Under Include in Saved Settings, uncheck any New dialog settings that you don’t want included in the preset.
6. Click OK. Your new preset will appear on the Preset menu in the New dialog.
➤ To delete a user-created preset, choose it from the Preset menu, click Delete Preset, then click Yes (this can’t be undone).A
Resolution and dimensions for the Web
Choosing the correct fi le resolution for Web output is a no-brainer: It’s always 72 ppi.
Choosing the correct dimensions for Web output requires a little more forethought, because it depends on how your Photoshop images are ultimately going to be used in the Web page layout. To quickly create a document with the proper dimensions
and resolution for Web output, choose a preset in step 3 at right. To determine a maximum custom size for a Photoshop image to be displayed on a Web page, fi rst estimate how large your user’s browser window is likely to be, then calculate how
much of that window the image is going to fi ll.
Currently, the most common monitor size is 1024 pixels wide by 768 pixels high. Most viewers have their browser window open to a width of approximately 1000 pixels. If you subtract the space occupied by the menu bar, scroll bars, and other
controls in the browser interface, you’re left with an area of up to 800 x 600 pixels; you can use those dimensions as a guideline. If your Photoshop fi le is going to be used as a small element in a Web page layout, you can choose smaller dimensions.
Creating a new, blank document
In these instructions, you will create a new, blank document. You can drag and drop or copy and paste imagery into this document from other fi les,or draw or paint imagery by hand using brushes. Th e images can then be edited with Photoshop commands, such as eff ects and fi lters.
To create a new, blank document:
1. Choose File > New (Ctrl-N/Cmd-N). Th e New dialog opens.A
2. Type a name in the Name fi eld.
3. Do either of the following: Choose a preset size option from one of the three categories on the Preset menu: the Default Photoshop Size; a paper size for commercial and desktop printers; or a screen size for Web, mobile, fi lm, and video output. Next,choose a specifi c size for that preset from the
Size menu.
Choose a unit of measure from the menu next to the Width fi eld; the same unit will be chosen automatically for the Height (or to change the unit for one dimension only, hold down Shift while choosing it). Next, enter custom Width and Height values (or use the scrubby sliders).

4. Enter the Resolution required for your target output device — be it an imagesetter or the Web. For the Web, enter 72; for print output,see our discussion of resolution on page 20.You can use the scrubby slider here, too.
5. Choose a document Color Mode (RGB Color is recommended), then from the adjacent menu,choose 8 bit or 16 bit as the color depth. You can convert the image to a diff erent color mode later, if needed (see “Photoshop document color modes” on pages 3–4).
6. Note the Image Size, which is listed on the right side of the dialog. If you need to reduce that size, you can choose smaller dimensions,a lower resolution, or a lower bit depth.
7. For the Background of the image, choose Background Contents: White or Background
Color; or choose Transparent if you want the bottommost tier of the document to be a layer.(To choose a Background color, see Chapter 11. To learn about layers, see Chapter 8.)
8. Click the Advanced arrowhead, if necessary, to display additional options, then choose a Color Profi le. Th is list of profi les will vary depending
on the document Color Mode.
(Note: you can also assign or change the profi le later in the Edit > Assign Profi le dialog. To learn more about color profi les,) For Web or print output, leave the Pixel Aspect Ratio on the default setting of Square Pixels.For video output, choose an applicable option
9. Click OK. A new, blank document window appears onscreen. To save it, see page 24.
➤ To force the New dialog settings to match those of an existing open document, open the New dialog, then from the bottom of the Preset menu, choose the name of the document that has the desired dimensions.
➤ If the Clipboard contains graphic data (say,that you copied from Adobe Photoshop or Illustrator), the New dialog will automatically display the dimensions of that content.Choosing Clipboard from the Preset menu in the New dialog accomplishes the same thing. If you want to prevent the Clipboard dimensions from displaying, and display the last-used fi le dimensions instead, hold down Alt/Option as
you choose File > New.


