vendredi 18 novembre 2011

Calculating the correct fi le resolution

Calculating the correct fi le resolution


Resolution for print If you shoot digital photos, your camera will preserve either all the pixels that are captured as raw fi les or a portion of the pixels that are captured as small, medium, or large JPEG fi les. If you use a scanner to acquire images, you can control the number of pixels the device captures by setting the input resolution in the scanner software.
High-resolution photos contain more pixels, and therefore fi ner details, than low-resolution photos, but they also have larger fi le sizes, take longer to render onscreen, require more processing time to edit, and are slower to print. Low-resolution images, however, look coarse and jagged and lack detailwhen printed. Your fi les should have the minimum resolution to obtain the desired output quality from your intended output device at the desired output size — but not much higher. Th ere are three ways to set the resolution value for your digital fi les.
➤ If you open raw digital or JPEG photos into the Camera Raw dialog, which we highly recommend, you can specify an image resolution there
➤ After opening your fi les into Photoshop, you can change the image resolution in the Image Size dialog
➤ When scanning photos, you’ll set the image resolution using the scanning software for that device.
Th e print resolution for digitized images (from a camera or scanner) is calculated in pixels per inch (ppi). A–C For output to an inkjet (desktop) printer, the fi le resolution should be between 240 and 300 ppi.
Commercial print shops have specifi c requirements for their particular output devices, so it’s important to ask them what resolution and halftone screen frequency settings they’re going to use before choosing a resolution for your fi les. For a grayscale image, the proper resolution will usually be around one-and-a-half times the halftone screen frequency (lines per inch) setting of the output device, or 200 ppi; for a color image, the resolution will be around twice the half tone screen frequency, or 250–350 ppi.




Working with 16 bits per channel

Working with 16 bits per channel


To get good-quality output from Photoshop, a wide range of tonal values must be captured at the outset. Th e wider the dynamic range of your chosen input device, the fi ner the subtleties of color and shade it can capture. Most advanced amateur and professional digital SLR cameras capture at least 12 bits of accurate data per channel.
Like cameras, scanners range widely in quality:
Consumer-level scanners capture around 10 bits of accurate data per channel, whereas the high-end professional ones capture up to 16 bits of accurate
data per channel.
Shadow areas in particular are notoriously difficult to capture well. But if your camera can capture 12 to 16 bits per channel (or you work with high-resolution scans), you will have a head start, because your fi les will contain an abundance of pixels in all levels of the tonal spectrum. Photoshop can process fi les that are in 8, 16, or32 Bits/Channel mode. All Photoshop commands are available for 8-bit fi les. Most Photoshop commands are available for 16-bit fi les (e.g., on the
Filter menu, the Liquify and Lens Correction fi lters are available, as are some or all of the fi lters on the Blur, Noise, Render, Sharpen, Stylize, and Other submenus, whereas fi lters on the other submenusare not). Too few Photoshop commands are available for 32 Bits/Channel fi les to make such fi les a
practical choice.
Although you can lower the bit depth of your fi les via the Image > Mode submenu, it’s better to keep them in 16 Bits/Channel mode. Th e editing and resampling commands in Photoshop can degrade the image quality, but the extra pixels in 16-bit images make this less of a problem.A–B The tonal adjustment commands in particular, such as Levels and Curves, remove pixel data and alter the distribution of pixels across the tonal spectrum.
Signs of pixel loss from destructive edits will be more visible in a high-end print of an 8-bit image than in a 16-bit image. Because 16-bit images contain an ample number of pixels in all parts of the tonal spectrum at the outset, more tonal values are preserved, and the resulting output is higher quality.
To summarize, these are some basic facts about 16-bit fi les to consider:
➤ Photoshop can open 16-bit fi les in CMYK orRGB mode.
➤ 16-bit fi les can be saved in many formats, suchas Photoshop (.psd), Large Document (.psb),Photoshop PDF (.pdf), PNG (.png), TIFF (.tif),
and JPEG 2000 (.jpf).
➤ From the Mac OS, you can print 16-bit fi les,provided your printer supports 16-bit printing.
➤ For commercial print output, your output service provider may request 8-bit fi les, in which case you will need to convert them after image-editing.
Note: If system or storage limitations prevent you from working with 16-bit images, consider following this two-stage approach: Perform the initial tonal corrections (such as Levels and Curves adjustments) on the 16-bits-per-channel image, then
convert it to 8 bits per channel for further editing.


Buying, and choosing settings for, a digital camera

Buying, and choosing settings for, a digital camera


Buying a digital camera

If you’re shopping for a digital camera, the fi rst step is to fi gure out which model suits your output requirements and, of course, your budget. Two factors to consider in this regard are a camera’s megapixel value and the size of its digital light sensor.
Camera manufacturers usually list the resolution of a model as width and height dimensions in pixels (such as 3000 pixels x 2000 pixels). Multiply the two values, and you’ll arrive at a number in the millions, which is the number of pixels the camera captures in each shot. Th is is known as the camera’s megapixel value. If your camera captures a suffi -cient number of pixels, you’ll be able to print highquality closeups and enlargements of your photos.
Compact, inexpensive “point-and-shoot” cameras off er few or no manual controls and have a resolution of 6 to 10 megapixels. Th ey capture enough detail to produce decent-quality 5" x 7" prints but not larger, and acceptable Web output.
Advanced amateur camera models have a resolution of 8 to 12 megapixels. You can get high-quality 8" x 10" prints from these cameras, and they off er
more manual controls.
Professional camera models (such as digital SLRs) have a resolution of 12 megapixels or higher and can produce high-quality 11" x 14" prints or larger — but they’re costly. More importantly, the digital light sensors in such cameras are larger and more sensitive than those in lesser cameras.
Th ey record more precise detail and produce a higher-quality image, with less visual noise. Highmegapixel cameras with large sensors aren’t for everyone — and not just because of their price tag.
Images with a high megapixel count have larger fi le sizes, take longer to upload from the camera to the computer, and require a larger hard drive for storage.
(See our comparison of megapixels and print size on page 22.) Unless you tend to crop your photos or output large prints, an 8- to 10-megapixel camera will be better suited to your needs.
Aside from the megapixel count and the size of the sensor, make sure the camera you buy can accommodate a wide assortment of lenses.
For more advice about buying a camera, you can visit the website for PC Magazine (pcmag.com) or Macworld (macworld.com). Photography magazine websites are also good sources of information.

Choosing settings in your digital camera

You’ve acquired a camera (congratulations!) — nowyou may want some pointers on how to use it.
To get good-quality photographs, in addition to establishing the right lighting conditions, composing the shot artistically, etc., you need to choose your camera settings wisely. Here are some basic guidelines:
➤ Medium- and high-end digital cameras let you choose an ISO setting, which controls the sensitivity of the camera’s digital sensor to light (and is comparable to fi lm speed in fi lm photography). High ISO settings tend to produce digital noise in low-light areas, so it’s best to choose the lowest ISO setting that still
enables you to get the desired exposure.
➤ Decide whether to have your camera capture the photos in the JPEG format or even better, as unprocessed raw fi les.

➤ Choose a color space for your camera: sRGB for onscreen or Web output, or Adobe RGB for print output.

➤ For JPEG photos, choose a white balance setting that’s appropriate for the lighting conditions in which the photos will be shot; the camera will process the image data based on this setting. For raw fi les, you can ignore the white balance setting, as the images won’t be processed inside the camera.

➤ If your camera has a histogram display, use it to verify that your shot was taken with the correct exposure settings (aperture and shutter speed). In an overexposed image, insuffi cient details are captured in the highlight areas; in
an underexposed image, insuffi cient details are captured in the shadow areas. Photoshop can process and adjust only the details that your camera captures.
Regardless of whether you shoot JPEG or raw photos, most exposure defi ciencies, color casts, and other imaging problems can be corrected via the Camera Raw dialog and then the photo can be further corrected via an assortment of adjustment commands in Photoshop.

jeudi 17 novembre 2011

Changing color profiles

Changing color profiles

When a fi le’s profi le doesn’t conform to the current working space (Adobe RGB, in our case) or the color profi le is missing altogether, you can use the Assign Profi le command to assign the correct one.You may notice visible color shifts if the color data of the fi le is reinterpreted to conform to the new profi le, but rest assured, the color data in the actual image is preserved. Do keep Preview checked,though, so you can see what you’re getting into.
 

To change or remove a fi le’s color profi le:

1.
With a fi le open in Photoshop, choose Edit >Assign Profi le. If the fi le contains layers, an alert may appear, warning you that the appearance of the layers may change; click OK. The Assign Profi le dialog opens.A

2. Check Preview, then click one of the following:
To remove the color profi le, click Don’t Color Manage Th is Document.
To assign your current working space to the fi le, click Working [document color mode and the name of your chosen working space].If you followed our instructions for color management, you’ve already specifi ed Adobe RGB as the Working RGB space, but you can click this option for any photo that wasn’t shot or scanned using that color space.
To assign a diff erent profi le, click Profi le, then choose a profi le that diff ers from your current working space.

3. Click OK.


Th e Convert to Profi le command lets you preview the conversion of a document to an assortment of output profi les and intents, and then converts the color data to the chosen profi le. 
Note: Th is command performs a mode conversion and changes the actual color data in your fi le!

To convert a fi le’s color profi le:

1. Choose Edit > Convert to Profi le. In the Convert to Profi le dialog,B check Preview.

2. Under Destina tion Space, from the Profi le menu, choose the profi le you want to convert the fi le to (it doesn’t necessarily have to be the current working space).

3. Under Conversion Options, choose an Intent(for the intents, see the sidebar on page 405).

4. Leave the default Engine as Adobe (ACE) and keep Use Black Point Compensation and Use Dither checked.

5. Optional: Check Flatten Image to Preserve Appearance to merge all layers and adjustment layers in the document.

6. Click OK


Acquiring printer profiles

Acquiring printer profiles

Th us far, we’ve shown you how to set your camera to the Adobe RGB color space, calibrate your display, and specify Adobe RGB as the color space for Photoshop. Next you’ll learn how to acquire the proper printer profi le(s) so you can incorporate color management into your specifi c printing
scenario.
 

To download the printer profi le for an inkjet printer:

Most printer manufacturers have a website from which you can download either an ICC profi le for a specifi c printer/paper combination or a printer driver that contains a collection of specifi c ICC printer/paper profi les. Be sure to choose a profi le that conforms to the particular printer/paper combination you will be using.
 

1. On the following page, we step you through a few pages on the websites for two manufacturers of widely used printers: Epson, focusing on the Stylus Photo R series (Epson.com) (A–C, next page) and Canon (Canon.com) (D–F, next page).
Another option is to also download an ICC profi le for a specifi c printer/paper combo from the website for a paper manufacturer, such as ilford.com or crane.com/museo.


Note: Th e profi les for the newest printer models may not be available yet on these sites. Check back periodically.
 

2. After visiting the website, install the profi le you downloaded by following the instructions that
accompany it. On pages 404–405, we’ll show you how to use the profi le to soft-proof a document onscreen.

Saving custom color settings

Saving custom color settings
For desktop color printing, we recommended choosing North America Prepress 2 as the color setting for Photoshop (see page 10). For commercial printing, let the pros supply the proper color settings: Ask your print shop to send you a .csffi le with all the correct Working Spaces and Color Management Policies settings for their particular press. Th en all you’ll need to do is install that custom color settings fi le in the proper location by following the instructions below and, when needed, choose it from the Settings menu in the Color Settings dialog.

To save custom color settings as defaults for the Creative Suite:


1. In Windows, put the fi le in Program Files\Common Files\ Adobe \Color\Settings.
In the Mac OS, put the fi le in Users/[user name]/Library/Application Support/ Adobe/Color/Settings.


2. To access the newly saved settings fi le, open the Color Settings dialog, then choose the name of the .csf fi le from the Settings menu. If your print shop gives you a list of recommended settings for the Color Settings dialog — but not an actual .csf fi le — you can choose and then save that collection of settings as a .csf fi le by following theseinstructions.

To save custom color settings:


1. Choose Edit > Color Settings (Ctrl-Shift-K/Cmd-Shift-K). Th e Color Settings dialog opens.

2. Enter the required settings by choosing and checking the appropriate options.

3. Click Save and enter a fi le name (we recommend including the printer type in the name),keep the .csf extension and the default location, then click Save.

4. Click OK to exit the Color Settings dialog.

Customizing your color policies

Customizing your color policies

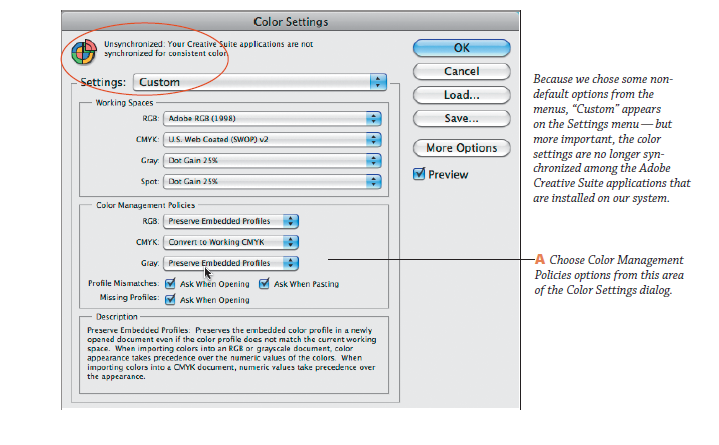
Th e current color management policies govern whether Photoshop honors or overrides a document’s settings if the color profi le in the fi le, when opened or imported, doesn’t conform to the current color settings in Photoshop. If you chose the North
America Prepress 2 setting in the Color Settings dialog (page 10), the Ask When Opening policy (the safest option, in our opinion) is already chosen for you, and you can skip these instructions.

To customize the color management policies for Photoshop:


1. Choose Edit > Color Settings (Ctrl-Shift-K/Cmd-Shift-K). Th e Color Settings dialog opens.A

2. From the Color Management Policies menus,choose an option for fi les that are to be opened or imported into Photoshop:


Off to prevent Photoshop from color-managing the fi les. Preserve Embedded Profi les if you expect to work with both color-managed and non-colormanaged documents, and you want each fi le to keep its own profi le.Convert to Working RGB or Convert to Working CMYK to have all documents that you open or import into Photoshop adopt the program’s current color working space. Th is is usually the best choice for Web output.

3. Do any of the following optional steps:

For Profi le Mismatches, if you check Ask When Opening, Photoshop will display an
alert if the color profi le in a fi le you’re opening doesn’t match the current working space.
Via the alert, you will be able to override the current color management policy for each fi le.Check Ask When Pasting to have Photo shop display an alert if it encounters a color profi le mismatch when you paste or drag and drop color imagery into a document. Th e alert lets you override your color management policy when pasting.
For fi les with Missing Profi les, check Ask When Opening to have Photoshop display an alert off ering an option to assign a profi le.


4. Click OK.